[Combine] Chapter3 Operator - Transforming
Updated:
들어가며
Chapter2에서는 Publisher, Subscriber 등에 대해서 전반적으로 알아보았다.
이제 Chapter3~7까지는 본격적으로 Combine operator에 대해서 알아 볼 예정이다. 그 중에서 Chapter3에서는 transforming과 관련된 operator에 대해서 알아보자
Transforming Operator
transforming Operator : publisher에 의해서 방출되는 값을 subscriber에게 유용한 형태로 변형할 때 사용하며, Swift standard library의 map, flatMap과 비슷하다.
💡 Combine에서 publisher로부터 방출된 값에 무언가를 취하는 함수들을 operator라고 한다. 그리고 각각의 operator들은 publisher를 반환한다고 할 수 있다. publisher는 upstream 값을 받고, 값을 조작하고나서 downstream으로 전송한다. 그리고 일반적으로 Error를 처리하기 위한 특수한 operator가 아니라면 publisher로 부터 받은 Error를 downstream으로 그대로 전달한다.
Collecting values
Publisher는 값을 단독으로 방출할 수도 있고, 값 들을 collection하여 보낼 수도 있다.
collect()
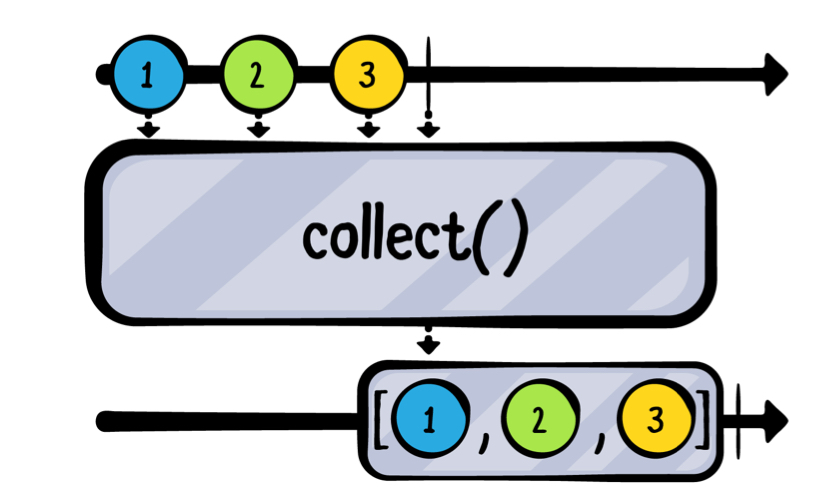
그림에서 보다시피 collect operator는 publisher가 방출하는 값들을 buffer에 모았다가 complete가 되는 시점에 배열로 반환해준다.
example(of: "collect") {
  ["A", "B", "C", "D", "E"].publisher
    .collect(2)
    .sink(receiveCompletion: { print($0) },
          receiveValue: { print($0) })
    .store(in: &subscriptions)
}

// Result
——— Example of: collect ———
["A", "B"]
["C", "D"]
["E"]
finished
위와 같이 collect operator는 매개변수를 사용해서 한 번에 배열로 받고 싶은 크기를 설정해 줄 수 있다. 이때 만약 제한숫자보다 적게 남은 경우에는 나머지를 같이 반환해준다.
위와 같이 제한이 있지 않고 collect() 를 사용하는 경우 모든 값을 전부 배열에 담아서 한 번에 반환해준다.
⚠️ collect operator와 같이 buffering operator는 특정한 count, limit이 없는 경우에는 조심해야한다. 왜냐하면 제한이 없다면 그들은 값들을 저장하기 위해서 메모리를 제한없이 사용하기 때문이다.
Mapping values
값들을 변형하고 싶을 때 사용
map(_:)
Swift의 map과 동일하게 작동하고, 단지 publisher가 방출하는 값들에 대해서 동작한다는 부분만 다르다
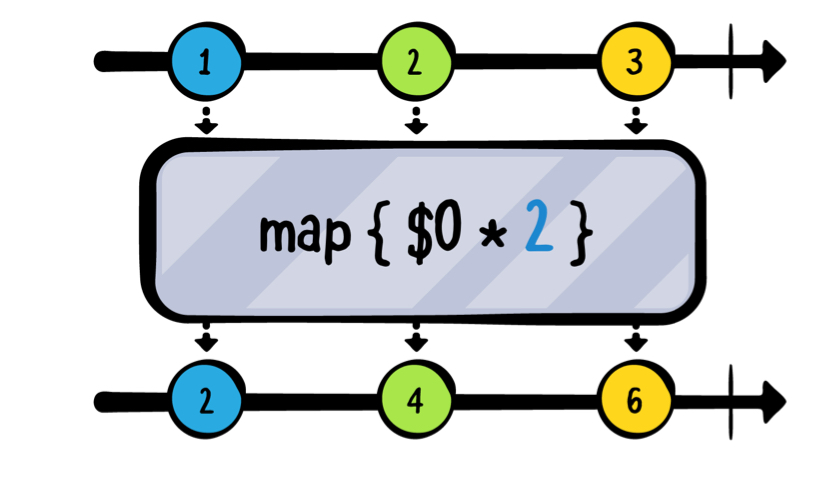
example(of: "map") {
  // 1
  let formatter = NumberFormatter()
  formatter.numberStyle = .spellOut

  // 2
  [123, 4, 56].publisher
    // 3
    .map {
      formatter.string(for: NSNumber(integerLiteral: $0)) ?? ""
    }
    .sink(receiveValue: { print($0) })
    .store(in: &subscriptions)
}

// Result
——— Example of: map ———
one hundred twenty-three
four
fifty-six
- 숫자를 spell out 하는 numberFormatter를 생성
- 정수 값들을 가지는 publisher 생성
mapoperator를 사용해서 정수 값들을 spell out 하여 반환하도록 한다
Map key paths
map 관련 Operator들은 3가지 버전을 가지고 있다.
- map<T>(_:)
- map<T0, T1>(_:_:)
- map<T0, T1, T2>(_:_:_:)
여기서 T는 주어진 key path 값의 타입을 의미한다.
💡 quadrantOf(x:y:) = x,y를 매개변수로 받아서 해당 x,y 값이 속하는 사분면을 반환하는 함수
💡 Coordinate = x, y 를 가지는 타입
example(of: "map key paths") {
  // 1
  let publisher = PassthroughSubject<Coordinate, Never>()

  // 2
  publisher
    // 3
    .map(\.x, \.y)
    .sink(receiveValue: { x, y in
      // 4
      print(
        "The coordinate at (\(x), \(y)) is in quadrant",
        quadrantOf(x: x, y: y)
      )
    })
    .store(in: &subscriptions)

  // 5
  publisher.send(Coordinate(x: 10, y: -8))
  publisher.send(Coordinate(x: 0, y: 5))
}

// Result
——— Example of: map key paths ———
The coordinate at (10, -8) is in quadrant 4
The coordinate at (0, 5) is in quadrant boundary
- Coordinate 타입을 가지는 PassthroughSubject 타입의 변수 생성
- publisher의 subscription 시작
mapoperator를 사용해서 x, y를 그들의 key path인 Coordinate에 할당- 내부의 내용을 print하고 quadrantOf() 실행
- coordinate를 publisher에게 전송
tryMap(_:)
map을 포함하는 몇몇의 operator는
try키워드를 붙일 수 있는데, 붙이게 되면 error를 던질수 있는 클로저를 가지게 된다
example(of: "tryMap") {
  // 1
  Just("Directory name that does not exist")
    // 2
    .tryMap { try FileManager.default.contentsOfDirectory(atPath: $0) }
    // 3
    .sink(receiveCompletion: { print($0) },
          receiveValue: { print($0) })
    .store(in: &subscriptions)
}

// Result
——— Example of: tryMap ———
failure(Error Domain=NSCocoaErrorDomain Code=260 "The folder “Directory name that does not exist” doesn’t exist." UserInfo={NSUserStringVariant=(
    Folder
), NSFilePath=Directory name that does not exist, NSUnderlyingError=0x6000026e5920 {Error Domain=NSPOSIXErrorDomain Code=2 "No such file or directory"}})
- Just를 사용해서 없는 디렉토리를 가지는 publisher 생성
tryMapoperator를 사용해서 존재하지 않는 디렉토리에 접근해서 content를 가져오려고 한다- 어떠한 값을 반환하거나, 에러를 반환받아서 print하도록 한다
⚠️ tryMap 을 사용하더라도 실제로 try를 사용해야한다.
Flattening publishers
flatMap(maxPublishers:_:)
flatMap은 여러개의 upstream publisher를 하나의 downstream publisher로 flatten시킨다. 즉, publisher들로 부터 방출되는 값들을 flatten하게 되고 그 결과로 반환되는 값은 대부분 처음에 upstream publisher가 받았던 타입이 아닐 것이다.
public struct Chatter {
  	public let name: String
  	public let message: CurrentValueSubject<String, Never>

  	public init(name: String, message: String) {
      	self.name = name
      	self.message = message
    }
}

example(of: "flatMap") {
  	// 1
  	let charlotte = Chatter(name: "Charlotte", message: "Hi, I'm Charlotte!")
  	let james = Chatter(name: "James", message: "Hi, I'm James!")
  	// 2
  	let chat = CurrentValueSubject<Chatter, Never>(charlotte)
  	// 3
  	chat
  		.sink(receivedValue: { print($0.message.value)})
  		.store(in: &subscriptions)
}

// Result
——— Example of: flatMap ———
Charlotte wrote: Hi, I'm Charlotte!
- charlotte, james 라는 Chatter 타입의 변수를 생성
- charlotte로 chat이라는 publisher를 초기화한다
- chat에 subscribe를 하고, chatter 구조체가 받는 메시지를 출력하도록 한다
// 4
charlotte.message.value = "Charlotte: How's it going?"
// 5
chat.value = james

// Result
——— Example of: flatMap ———
Charlotte wrote: Hi, I'm Charlotte!
James wrote: Hi, I'm James!
- charlotte의 메시지 값을 변경
- chat publisher의 current value를 james로 변경
Charlotte의 메시지가 변경되었지만 출력되지 않았는데, 그 이유는 Chatter publisher인 chat에 subscribe를 했지, 각각의 Chatter가 방출하는 message property에 subscribe를 하지 않았기 때문이다. 따라서 모든 chat의 message를 subscribe하려면 다음과 같이 수정하면 된다.
// 기존의 3번 부분을 다음과 같이 수정
chat
	// 6
	.flatMap { $0.message }
	// 7
	.sink(receivedValue: { print($0) })
	.store(in: &subscriptions)

// Result
——— Example of: flatMap ———
Hi, I'm Charlotte!
Charlotte: How's it going?
Hi, I'm James!
- Chatter 구조의 message publisher를 flat map한다
- 그리고 Chatter 객체가 아닌 받은 String 값을 출력하도록 수정
james.message.value = "James: Doing great. You?"
charlotte.message.value = "Charlotte: I'm doing fine thanks"

// Result
James: Doing great. You?
Charlotte: I'm doing fine thanks
chat이 아닌 james와 charlotte의 값을 바꿨는데도 메시지가 출력된다.
즉, flatMap operator는 이전에 정의된 것을 다시 불러와서 모든 publisher들로부터 받은 값들을 flatten 시켜서 하나의 publisher처럼 한다. 이때 메모리 문제가 발생할 수 있는데, 그 이유는 많은 publisher가 값을 방출하게 되면 이를 flatten하는데 버퍼링이 걸리게 되기 때문이다. 따라서 이러한 메모리 문제를 해결하기 위해서 몇 개의 publisher들로부터 값을 받고 buffer할 것인지를 maxPublisher 매개변수를 통해서 지정할 수 있다.
.flatMap(maxPublishers: .max(2)) { $0.message }
위와 같이 작성하면 최대 2개의 publisher로부터 값을 받고 buffer한다는 것이다. 만약 maxPublisher 를 설정하지 않으면 default는 .unlimited 이다.
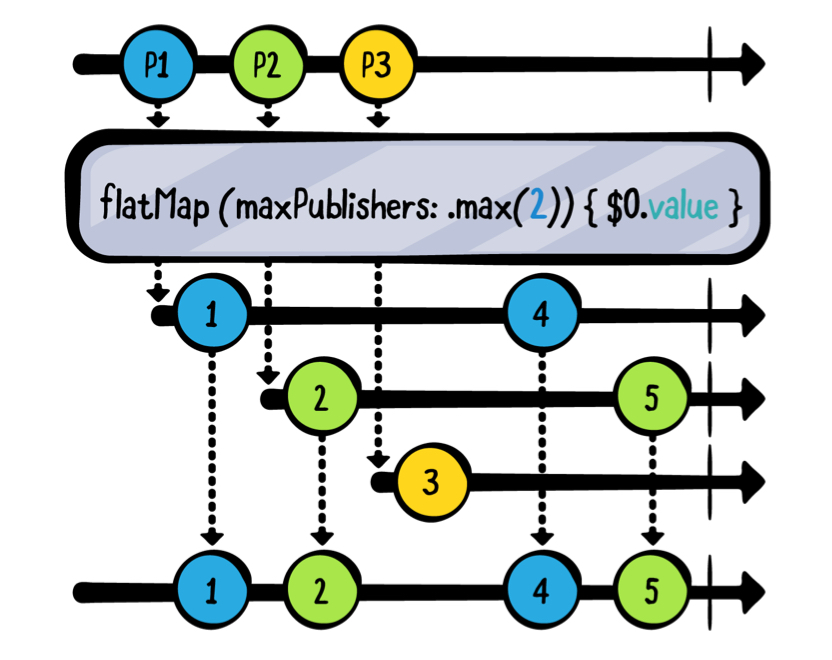
따라서 위의 그림과 같이 P1, P2, P3 publisher가 있을 때 maxPublishers 가 2이므로 먼저 보낸 P1, P2의 값만 수신하고 buffer하여 flatten하게 된다는 것이다.
// 8
let morgan = Chatter(name: "Morgan", message: "Hey guys, what are you up to?")
// 9
chat.value = morgan
// 10
charlotte.message.value = "Did you hear something?"

// Result
——— Example of: flatMap ———
Hi, I'm Charlotte!
Charlotte: How's it going?
Hi, I'm James!
James: Doing great. You?
Charlotte: I'm doing fine thanks
Did you hear something?
- 새로운 Chatter 객체 생성
- chat publisher에 새로 생성한 Chatter를 추가함
- Charlotte의 메시지를 변경
그러나 이미 위에서 maxPublishers 가 2이기 때문에 새로 추가한 Chatter의 값은 수신되지 않는다.
Replacing upstream output
종종 Nil-coalescing operator (??) 를 사용해서 nil 값이 있는 경우 대체할 값을 제공한다. Combine 또한 항상 값을 전달하고 싶은 경우에 사용할 수 있는 operator가 있다.
replaceNil(with:)
nil 값을 내가 정해놓은 값으로 대체하여 반환한다
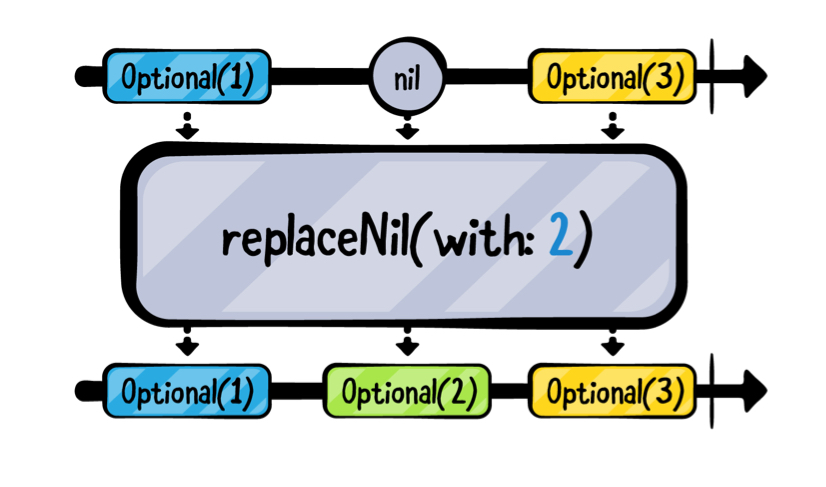
example(of: "replaceNil") {
  // 1
  ["A", nil, "C"].publisher
    .replaceNil(with: "-") // 2
    .sink(receiveValue: { print($0) }) // 3
    .store(in: &subscriptions)
}

// Result
——— Example of: replaceNil ———
Optional("A")
Optional("-")
Optional("C")
결과로 nil이 “-“로 대체되는 것을 확인할 수 있다.
⚠️ 그러나 operator 이름과 같이 nil을 non-nil 값으로 변경해주는 것이다. 그러나 만약 nil이 있는 경우 이를 벗기고 사용하고 싶은 경우에는 아래와 같이 하면 된다.
example(of: "replaceNil") {
  ["A", nil, "C"].publisher
    .replaceNil(with: "-")
  	.map { $0! }
    .sink(receiveValue: { print($0) })
    .store(in: &subscriptions)
}

// Result
——— Example of: replaceNil ———
A
-
C
💡 ?? vs replaceNil
?? : 또 다른 optional 값을 반환할 수 있음
replaceNil : optional 값을 반환할 수 없음, 즉 optional이 반드시 unwrapped되어야만 한다
replaceEmpty(with:)
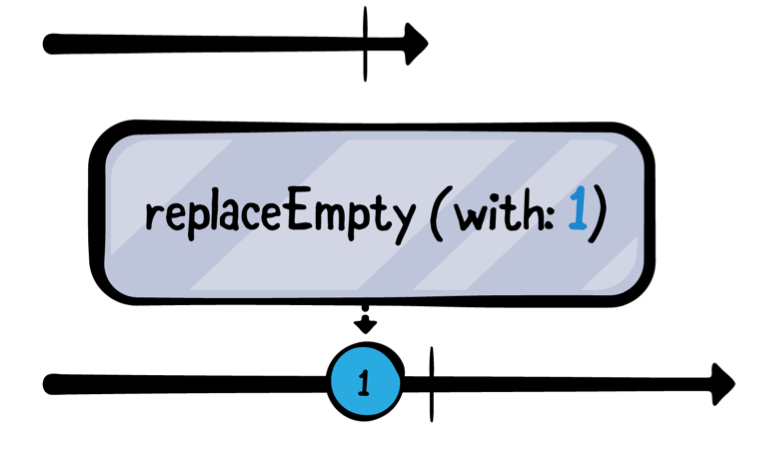
만약 publisher가 아무런 값도 방출하지 않고 끝나는 경우에는 값을 대체하거나, 삽입할 수 있다
example(of: "replaceEmpty(with:)") {
  // 1
  let empty = Empty<Int, Never>()

  // 2
  empty
    .replaceEmpty(with: 1)
    .sink(receiveCompletion: { print($0) },
          receiveValue: { print($0) })
    .store(in: &subscriptions)
}

// Result
——— Example of: replaceEmpty(with:) ———
1
finished
- Empty를 사용해서 publisher 생성
replaceEmptyoperator를 사용해서 만약 방출되는 값이 없이 complete 되면 1로 대체하도록 한다
💡 Empty : Empty publisher는 바로 .finished를 completion event로 방출하게 된다. 또한 compelteImmediately 매개변수를 false로 설정하면 never를 방출하도록 할 수도 있다. 주로 demo, testing 목적으로 많이 사용된다.
Incrementally transforming output
scan(_:_:)
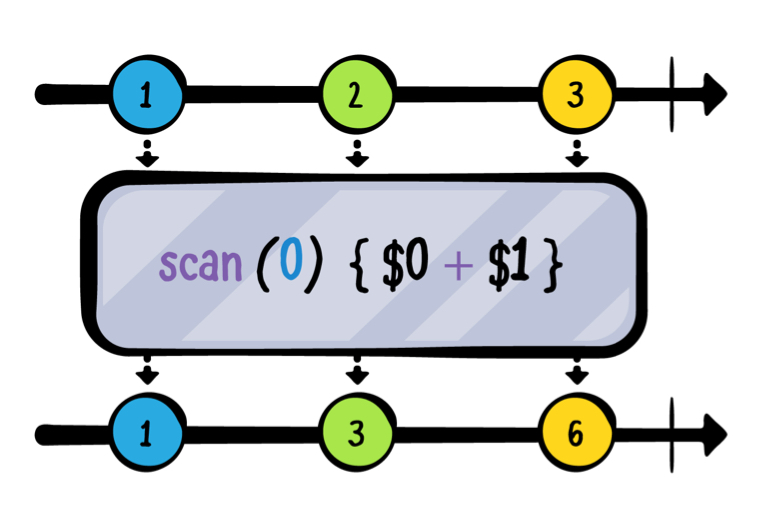
upstream publisher로부터 방출되는 현재 값을 클로저로 전달하고, 클로저 내부에서는 그 전 값과 함께 연산 후에 반환한다.
example(of: "scan") {
  // 1
  var dailyGainLoss: Int { .random(in: -10...10) }

  // 2
  let august2019 = (0..<22)
    .map { _ in dailyGainLoss }
    .publisher

  // 3
  august2019
    .scan(50) { latest, current in
      max(0, latest + current)
    }
    .sink(receiveValue: { _ in })
    .store(in: &subscriptions)
}
- -10 ~ 10 사이에서 랜덤한 숫자를 가지는 변수 생성
- 0 부터 21까지 총 22회 dailyGainLoss를 map하여 publisher 생성
- publisher에 subscribe를 시작하고, 50부터 시작해서 그전의 값과 현재 값을 더해 나가도록 한다. 이때 max()를 사용해서 currentValue가 0보다 작지 않도록 한다.
결과는 아래의 그림과 같이 plot으로도 확인할 수 있다.

마치며
이번 포스팅에서는 Operator 중에서 Publisher로부터 방출된 값들을 변형할 수 있는 operator들에 대해서 알아볼 수 있었다. 이들 중에는 기존의 Swift library에서 사용해 본 것과 동일한 이름이며, 역할도 비슷한 것들이 있어서 익숙했던 것 같다.
Chapter4에서는 Filtering과 관련된 operator에 대해서 알아보자.

Leave a comment