
[Combine] Chapter2 Publisher와 Subscriber - 1
Updated:
들어가며
지난 Chapter1에서는 Combine이 왜 필요하며, 개념적인 부분들에 대해서 알아보았다면 이번에는 Publisher와 Subscriber에 대해서 자세하게 예시를 통해서 알아보자.
Playground에서 예시를 작성할 것이며, 아래의 코드를 작성하고 시작하면 된다.
import Combine
var subscriptions = Set<AnyCancellable>()

public func example(of description: String, action:() -> Void) {
    print("\n------- Example of:",description, "-----")
    action()
}
example() 함수는 어떠한 것을 하는 것인지 설명을 String으로 받고 이를 출력하고나서 클로저를 수행하는 함수이다.
Publisher
Combine의 핵심은 Publihser 프로토콜이라고 할 수 있다. 이 프로토콜은 시간이 지남에 따라 한 개 이상의 subscriber에게 일련의 값을 전송할 수 있는 타입에 대한 요구사항을 정의한다. 즉, publisher는 값을 포함하는 이벤트를 내보내거나 게시한다.
그리고 이는 notification center와 비슷하다고 생각하면 된다. 실제로 NotificationCenter는 브로드캐스트 알림을 보낼 수 있는 Publisher 유형을 제공하는 publisher(for:object:) 메서드가 있다.
example(of: "Publisher") {
    // notification 이름 생성
    let myNotification = Notification.Name("MyNotification")

    // NotificationCenter.default에서 publisher() 메서드 실행후
    // 반환 값을 local value인 publisher에 저장
    let publisher = NotificationCenter.default.publisher(for: myNotification, object: nil)
}

// publisher() 살펴보기
public func publisher(for name: Notification.Name,
object: AnyObject? = nil) -> NotificationCenter.Publisher
publisher(for:object:) 메서드를 보면 default notification center가 브로드캐스트 알림을 보낼 때 Publisher 타입을 반환하는 것을 확인해 볼 수 있다.
그럼 notification center에서 publisher 없이 알림을 브로드캐스트 할 수 있는 경우, 알림을 publishing 하려는 이유는 무엇일까? 바로 이러한 메서드는 NotificationCenter와 같이 기존 API를 결합할 수 있는 방법인 이전 버전에서 새 버전으로 연결하는 다리라고 생각할 수 있다.
Publisher 는 두 가지 이벤트를 내보낼 수 있다.
- Value (혹은 elements)
- completion event
Publisher 는 0개 이상의 값을 내보낼 수는 있지만 completion event는 오로지 하나만 내보낼 수 있다. 즉, 일반적인 completion event나 error를 내보내게 되면, publisher는 더 이상 이벤트를 내보낼 수 없고 종료되는 것이다.
Publisher와 Subscriber를 사용하기 전에 먼저 기존의 Notification Center API를 사용해보자.
let center = NotificationCenter.default

// 기존에 생성한 notification을 받기 위해서 옵져버를 설정
let observer = center.addObserver(forName: myNotification,
                                  object: nil,
                                  queue: nil) { notification in
    print("Notification received")
}

// 생성한 이름으로 notification 발생
center.post(name: myNotification, object: nil)

// notification center에서 옵져버를 제거
center.removeObserver(observer)
실행시켜보면 post된 notification을 등록한 옵져버에서 받아서 print() 되는 것을 확인해 볼 수 있다.

Subscriber
subscriber는 publisher로부터 input을 받을 수 있도록 타입의 요구사항을 정의하는 프로토콜이다.
위에서 작성했던 notification을 처리하는 코드를 subscription으로 대체해보자.
example(of: "Subscriber") {
    // notification 이름 생성
    let myNotification = Notification.Name("MyNotification")

    // NotificationCenter.default에서 publisher() 메서드 실행후
    // 반환 값을 local value인 publisher에 저장
    let publisher = NotificationCenter.default.publisher(for: myNotification, object: nil)

    let center = NotificationCenter.default
}
새로운 example() 함수를 작성하고 다음과 같이 작성했을 때, 지금 notification을 post하려고 하면 publisher는 내보내지 못한다. 바로 이 점을 기억해야하는데, publisher는 적어도 하나의 subscriber가 있을 때만 이벤트를 내보낼 수 있다는 것이다.
Sink 연산자
let subscription = publisher.sink { _ in
        print("Notification received from a publisher!")
    }

// sink()
public func sink(receiveValue: @escaping ((Self.Output) -> Void)) -> AnyCancellable
publisher.sink() 를 호출하여 subscription을 생성해주는데, 이때 메서드의 명을 명확하게 해서 sink의 역할이라는 것을 알려주는 것은 중요하다. 실제로 sink() 메서드를 보면, publisher로부터 받은 output을 처리하기 위해서 클로저와 함께 subscriber를 연결해주는 쉬운 방법을 제공하고 있는데, 위의 예에서는 클로저 내부는 무시하고 내부에 print()만 추가해 notification을 수신했다고만 알린다.
sink operator는 publisher가 내보내는 값들을 계속 수신한다. 이는 unlimited demand 라고 알려져 있다. 그리고 이에 sink operator는 completion event를 수신하고 처리하는 closure 하나와 수신한 값을 처리하는 closure, 두 가지 closure를 제공한다.
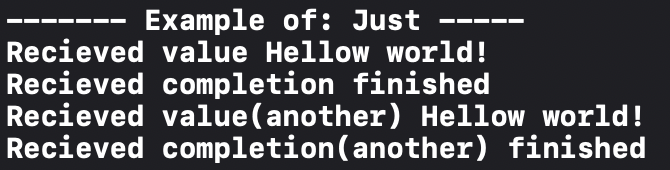
example(of: "Just") {
    // 1️⃣ Just를 사용해서 publisher를 생성
    // Just는 기본 값 타입으로 publisher를 생성해주는 타입
    let just = Just("Hellow world!")

    // 2️⃣ publisher인 just에 subscription을 생성해주고
    // 이벤트나 값에 따라서 메시지를 Print()
    _ = just
        .sink(
            receiveCompletion: {
                print("Recieved completion", $0)
        },
            receiveValue: {
                print("Recieved value", $0)
            })
}
// Just
// A publisher that emits an output to each subscriber just once, and then finishes.
public struct Just<Output> : Publisher

sink operator가 어떻게 작동하는지는 위의 코드를 보면 확인해 볼 수 있다.
- Just를 사용해서 publisher를 생성
- publisher에 subscription을 생성하고, 이벤트인지 값인지에 따라서 처리
⚠️ 이때 Just 를 확인해보면, 각각의 subscriber에게 한 번 output을 내보내고 끝나는 publisher이다. 따라서 아래에 또 다른 subscriber를 생성하고 실행해보면 모든 subscriber에게 정확히 한 번만 output을 내보내고 끝나는 것을 확인할 수 있다.
_ = just
    .sink(
        receiveCompletion: {
            print("Recieved completion(another)", $0)
    },
        receiveValue: {
            print("Recieved value(another)", $0)
        })
Assign 연산자
assign(on:to:) operator는 수신되는 값을 객체의 KVO를 따르는 프로퍼티로 할당할 수 있다.
example(of: "assign(to:on)") {
    // 1️⃣
    class SomeObject {
        var value: String = "" {
            didSet {
                print(value)
            }
        }
    }
    // 2️⃣
    let object = SomeObject()
    // 3️⃣
    let publisher = ["Hello", "world!"].publisher
    // 4️⃣
    _ = publisher
        .assign(to: \.value, on: object)
}
- 새로운 값을 출력하는
didSet프로퍼티 옵져버를 프로퍼티로 가지는 클래스 생성 - 클래스의 인스턴스 생성
- 문자열 배열을 publisher로 생성
- publisher에 subsciber를 추가하고, 인스턴스의 value 프로퍼티에 각각 수신된 값을 할당

Republishing
@Published 프로퍼티 래퍼로 표기된 다른 프로퍼티를 통해 publisher가 내보낸 value를 다시 내보내는데 사용할 수 있는 assign operator도 있다.
example(of: "assign(to:)") {
    // 1️⃣
    class SomeObject {
        @Published var value = 0
    }

    let object = SomeObject()
    // 2️⃣
    object.$value
        .sink {
            print($0)
        }
    // 3️⃣
    (0..<10).publisher
        .assign(to: &object.$value)
}
@Published프로퍼티 래퍼로 표기된 프로퍼티를 가지고 있는 클래스와 클래스의 객체를 생성@Published프로퍼티 래퍼 : 일반 프로퍼티로 접근할 수 있을 뿐만 아니라 값에 대한 publishere 생성함
$접두사를@Published프로퍼티에 사용해서 publisher에 접근하고 subscribe하며, 수신된 값을 print 한다- 숫자 publisher를 생성하고, 내보내지는 값들을
obejct의 value publisher에 할당한다.&사용은 프로퍼티에 대한 inout 참조를 나타내기 위해서 사용한다
assign(to:) operator는 AnyCancellable token을 반환하지 않는데, 왜냐하면 @Published 프로퍼티가 deinitailize 될 때 내부적으로 라이프사이클을 관리하고 subscription을 취소하기 때문이다.
이 operator를 사용하는 것은 다음과 같은 이유로 효율적이다.
class MyObject {
  @Published var word: String = ""
  var subscriptions = Set<AnyCancellable>()

  init() {
    /*
    수정 전
    ["A", "B", "C"].publisher
      .assign(to: \.word, on: self)
      .store(in: &subscriptions)
    */

    ["A", "B", "C"].publisher
      .assign(to: &$word)
  }
}
위와 같은 예시에서 AnyCancellable 결과를 저장하는데, 이때 강한 참조가 발생하게 된다. 따라서 이를 assign(to: &$word) 로 변경하면 이러한 문제를 미리 방지할 수 있다.
Cancellable
subcriber가 완료되고 더 이상 publisher로부터 값을 수신하는 것을 원치 않을 때, subscription을 취소하여 리소스를 release하여 네트워크 콜과 같은 작업이 발생하지 않도록 하는 것이 좋다.
Subscription은 AnyCancellable 타입을 “cancellation token”으로 반환한다. 그리고 이는 완료되었을 때 subscription을 취소하게 해준다. AnyCancellable 은 Cancellable 프로토콜을 따르고 있으며, cancel() 메서드를 필요로 한다.
위에서 작성했던 Subscriber 예시를 다음과 같이 마무리 할 수 있다.
example(of: "Subscriber") {
    // notification 이름 생성
    let myNotification = Notification.Name("MyNotification")

    // NotificationCenter.default에서 publisher() 메서드 실행후
    // 반환 값을 local value인 publisher에 저장
    let publisher = NotificationCenter.default.publisher(for: myNotification, object: nil)

    let center = NotificationCenter.default

    let subscription = publisher.sink { _ in
        print("Notification received from a publisher!")
    }
    // 1️⃣
    center.post(name: myNotification, object: nil)
    // 2️⃣
    subscription.cancel()
}
- notification을 post
- subscription을 취소하는데, 이때 Subscription 프로토콜은
Cancellable프로토콜을 상속했으므로,cancel()메서드를 호출 할 수 있다.

subscription에 대해서 명시적으로 cancel() 을 호출하지 않으면, publisher가 완료되거나, 정상적인 메모리 관리로 인해서 메모리에 있던 subscription이 초기화되어 취소될 때까지 계속해서 있을 것이다.
⚠️ 위에 예시에서는 subscription에서 반환되는 값을 저장하지 않았지만, 실제 프로젝트에서는 만약 저장하지 않는다면 subscription은 해당 범위를 벗어나는 즉시 cancel되니까 이를 주의하자.
Publisher와 Subscriber 이해하기
publisher와 subscriber 사이에서 일어나는 일은 아래의 그림과 같다.
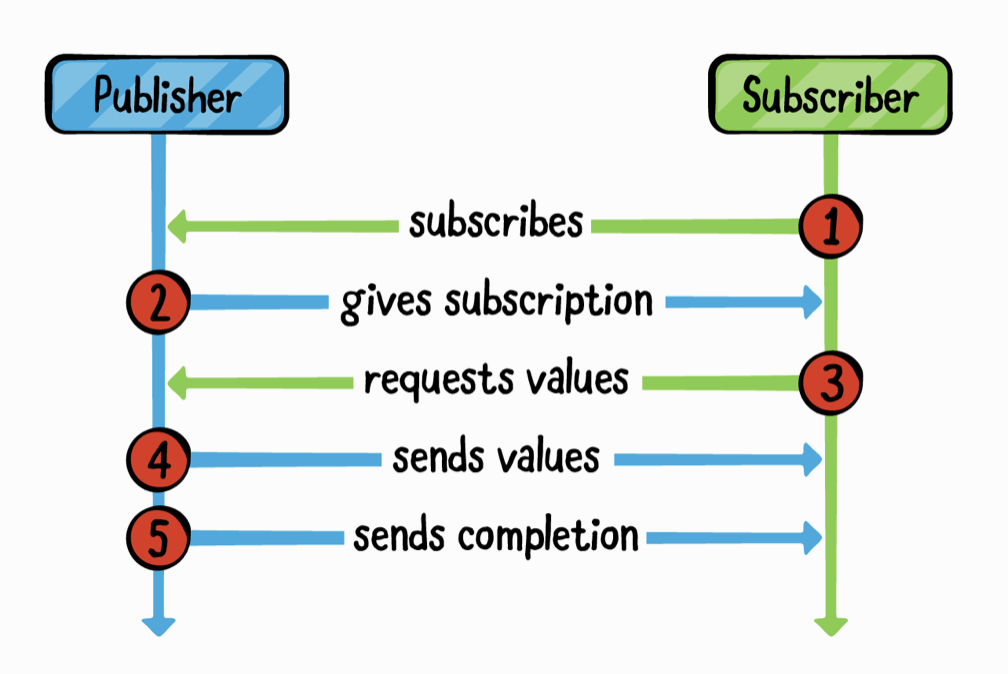
Subscriber는 Publisher를 subscribe한다Publisher는 subscription을 생성하고, 이를 subscriber에게 준다Subscriber는 값을 요청한다Publisher는 값을 전송한다Publisher는 completion을 전송한다
실제 Publisher 프로토콜을 보면 다음과 같다.
public protocol Publisher {
    // 1️⃣
    associatedtype Output
    // 2️⃣
    associatedtype Failure : Error
    // 3️⃣
    func receive<S>(subscriber: S)
        where S : Subscriber,
        Self.Failure == S.Failure,
        Self.Output == S.Input
}

extension Publisher {
    // 4️⃣
    public func subscribe<S>(on scheduler: S,
    options: S.SchedulerOptions? = nil) -> Publishers.SubscribeOn<Self, S>
    where S : Scheduler
}
- Publisher가 내보낼 수 있는 값의 타입
- Publisher가 생성하는 에러의 타입,
Never키워드는 publisher가 절대 에러를 생성하지 않는 경우 사용 - subscriber가 publisher에 부착하기 위해서 호출하는 함수
subscribe()의 실행은 receive() 함수를 호출하여 subscriber를 publisher에 부착
그리고 이때 associatedtype 은 subscriber가 subscription을 생성하기 위해서 반드시 일치시켜야만 하는 publisher의 인터페이스이다.
Subscriber 프로토콜을 보면 다음과 같다.
public protocol Subscriber : CustomCombineIdentifierConvertible {
    // 1️⃣
    associatedtype Input
    // 2️⃣
    associatedtype Failure : Error
    // 3️⃣
    func receive(subscription: Subscription)
    // 4️⃣
    func receive(_ input: Self.Input) -> Subscribers.Demand
    // 5️⃣
    func receive(completion: Subscribers.Completion<Self.Failure>)
}
- subscriber가 수신할 값의 타입
- subscriber가 수신할 수 있는 에러의 타입,
Never는 subscriber가 에러를 받지 않는다 - publisher가 subscription을 전달하기 위해서 subscriber에 호출한다
- publisher가 subscriber에게 새롭게 내보내지는 값을 전달하기 위해서 subscriber에 호출한다
- publisher가 내보내는 값이 끝났거나, 완료되었거나, 에러가 발생한 경우에 subscriber에게 알리기 위해서 호출한다
즉, publisher와 subscriber 사이의 연결이 바로 subscription이다. 그리고 subscription 프로토콜은 다음과 같다.
public protocol Subscription : Cancellable, CustomCombineIdentifierConvertible {
    func request(_ demand: Subscribers.Demand)
}
이때 subscriber는 request() 를 호출하여 수신할 값의 최대 개수를 표시하거나 제한 없이 받는 것을 나타낸다.
⚠️ Backpressure management는 subscriber가 얼마나 많은 값을 수신할 의사가 있는지 나타내는 것을 의미한다. 만약 이를 관리하지 않으면, subscriber는 처리할 수 있는 것보다 많은 값을 publisher로부터 수신하게 되고 이로 인해 문제가 발생하게 된다.
Subscriber에서 receive(_:) 메서드는 Demand를 반환한다. subscription.request(_:) 를 receive() 내부에서 호출하여 수신할 값의 최대값을 설정하더라도, 새로운 값이 수신될 때마다 최대값을 조정할 수 있다.
⚠️ Subscriber.receive(_:) 에서 max를 조정할 수 있다. 예를 들어 새로운 max 값을 현재 max 값에 더할 수도 있다. 그러나 max 값은 항상 양수여야하며, 음수를 넘기게 되면 fatalError가 발생하게 된다. 즉, max 값은 새 값이 수신될 때마다 증가될 수 있지만 감소시킬수는 없다.
마치며
이번 포스팅에서는 Publisher, Subscriber와 Sink, Assign operator, Cacenllable에 대해서 알아보았다. 이제 다음 포스팅에서는 이제 Custom Subscriber의 작성과 Future, Subject, Demand의 변경 등에 대해서 알아볼 것이다.
Leave a comment